Introduction
How to Disassemble Xbox One Controller: Understanding how to disassemble an Xbox One controller is an invaluable skill for any gaming enthusiast. Whether it’s for maintenance, cleaning, or repairs, knowing the inner workings of your controller can save you time and money. This guide aims to provide a comprehensive step-by-step process, detailing the necessary tools and precautions needed to ensure a successful disassembly.
The process of disassembly might seem daunting at first glance, but with the right tools and a steady hand, it can be a straightforward task. This guide will walk you through each step, ensuring you understand every aspect of the disassembly process.
Preparing for Disassembly
Before you start, gather all the necessary tools. A Torx T8 screwdriver, a pry tool, and a clean, soft cloth will suffice. It’s crucial to work in a clean and organized workspace to keep track of all the small components of the controller.
- Make sure you have a Torx T8 screwdriver, a pry tool, and a clean, soft cloth.
- Set up a clean and organized workspace to prevent losing any small components.
Take note, disassembling your Xbox One controller may void its warranty. Hence, if your controller is still under warranty, it would be best to let professionals handle any repairs.
Step-by-Step Disassembly Guide
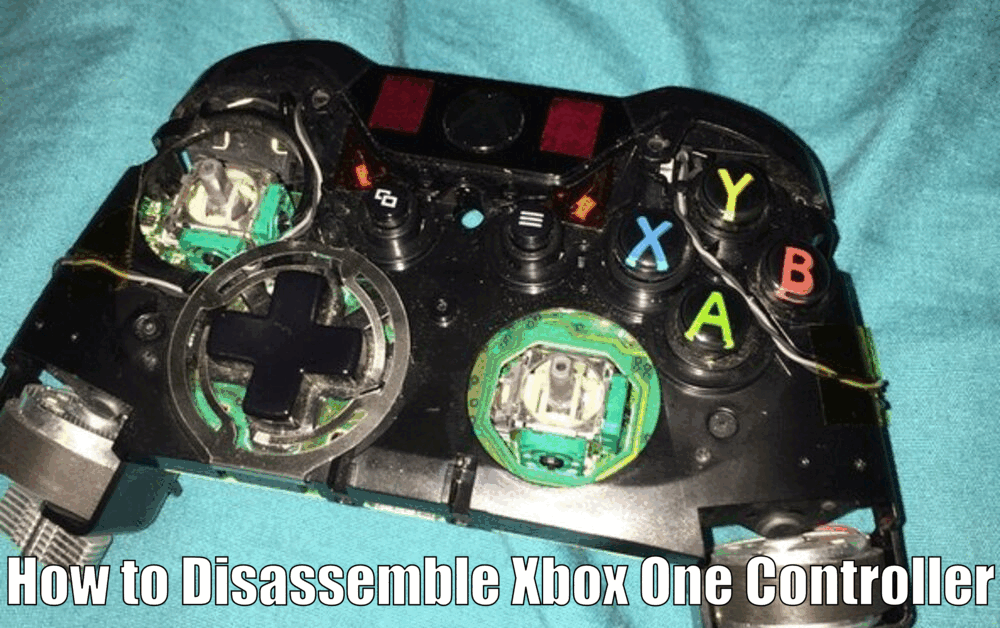
Start by removing the battery pack or batteries from the controller. This is crucial to avoid any potential electrical mishaps. Afterward, carefully detach the back panel using your pry tool.[How to Disassemble Xbox One Controller]
Read Also How to Connect a Xbox One Controller to an iPhone Easily

- To begin the disassembly process, remove the battery pack or batteries from the controller.
- Use a pry tool to carefully detach the back panel.
Next, remove the five screws that hold the controller together. Remember to store them in a safe place. Once the screws are out, you can disconnect the ribbon cables and connectors that link the controller’s components.
- Locate and remove the five screws that secure the controller.
- Store the screws in a safe place to avoid misplacing them.
- Disconnect the ribbon cables and connectors that connect the controller’s components.
Read Also How to See Xbox Clips on PC Best Method
Finally, separate the front and back shells. Be gentle to avoid damaging any parts.
- Gently separate the front and back shells of the controller.
- Handle the components with care to prevent any damage.
Cleaning and Maintenance
Once open, you’ll see the various components of your controller. Use a soft, dry cloth to clean any dust or grime. Inspect each part for signs of wear or damage, as these can affect the controller’s performance.
- Take a soft, dry cloth and carefully clean any dust or grime from the controller’s components.
- Inspect each part for signs of wear or damage that may impact performance.
If the buttons or thumbsticks are sticking, a small amount of lubricant can help. Be sure to use a plastic-safe lubricant to avoid damaging your controller.
- Apply a small amount of plastic-safe lubricant to the buttons or thumbsticks if they are sticking.[How to Disassemble Xbox One Controller]
Read Also How to Xbox Cloud Game on Mac Easy steps
Troubleshooting and Repair Tips
Disassembling your controller can help address common issues like unresponsive buttons or stick drift. Cleaning the buttons and replacing worn-out parts can drastically improve your controller’s performance.
- Disassembling the controller can help fix common issues such as unresponsive buttons or stick drift.
- Clean the buttons thoroughly and consider replacing any worn-out parts to enhance the controller’s performance.
If a component is faulty, replacement parts are readily available online. Make sure to buy from reputable sources to ensure the quality of the parts.
- If you encounter a faulty component, you can easily find replacement parts from reputable online sources.
Reassembling the Controller
Reassemble the controller by first aligning the front and back shells. Reconnect the ribbon cables and connectors, then secure the screws. Remember not to overtighten, as this could damage the controller.
- Align the front and back shells of the controller and ensure they fit together properly.
- Reconnect the ribbon cables and connectors to their respective ports.
- Secure the screws, but be careful not to overtighten them to avoid damaging the controller.
Finally, reinsert the battery pack or batteries, ensuring they are correctly oriented.
- Insert the battery pack or batteries back into the controller, making sure they are properly oriented.[How to Disassemble Xbox One Controller]
Testing and Final Thoughts
After reassembly, test all buttons and thumbsticks to verify the controller’s functionality. Regular maintenance and care can significantly extend the lifespan of your controller.
- Test all buttons and thumbsticks after reassembling the controller to ensure everything is functioning properly.
- Remember that regular maintenance and care are essential for prolonging the lifespan of your controller.
In conclusion, following safety precautions and instructions is key to successfully disassembling and reassembling your Xbox One controller. This guide provides a comprehensive approach, ensuring you are well equipped for the task.
How to Disassemble Xbox One Controller – FAQs
Q1: What tools do I need to disassemble an Xbox One controller?
A1: You will need a Torx T8 screwdriver, a pry tool, and a clean, soft cloth.
Q2: Can I disassemble my Xbox One controller if it is still under warranty?
A2: Disassembling your Xbox One controller may void its warranty. It is best to let professionals handle any repairs if your controller is still under warranty.
Q3: How do I clean the components of my Xbox One controller?
A3: Use a soft, dry cloth to clean any dust or grime from the components of your Xbox One controller.
Q4: What should I do if a component is faulty?
A4: If a component of your Xbox One controller is faulty, you can easily find replacement parts from reputable online sources.
3 thoughts on “How to Disassemble Xbox One Controller real easy”